RENAT
A Robotframework Extension for Network Automation Testing
Disclaimer
The Authors assume no responsibility for damage or loss of system performance as a direct or indirect result of the use of this software. This software is provided “as is” without express or implied warranty.
All product names and trademarks are the property of their respective owners, which are in no way associated or affiliated with this software. Use of these names does not imply any co-operation or endorsement.
- Ixia, IxiaNetwork, IxiaLoad are trademarks of IXIA
- Calient is a trademark of CALIENT NETWORKS, INC.
- Junos, Juniper are trademarks of Junipter Networks.
- Cisco is a trademark of Cisco Systems, Inc.
For details about Robot Framework see RobotFramework
Table of contents
- Disclaimer
- Table Of Contents
- Features
- Installation
- Usages
- More Examples
- Manual
- Copying And Copyrights
- Thanks
Features
The framework provides an simple way to conduct Network Automation Testing by using simple scenario as follow:
- An extension of widely used RobotFramework that add more supports for Network Automation Testing
- Easy to write and read testing scenario
- Separate testing data and logic
- Easy to collect logs and activities on testing devices
- Easy to add vendor-independent keywords for new platforms
- Support traffic generator (IxNetwork/IxLoad) and L1 Switch (Calient)
- Extend Selenium2 library for simple web appliance testing
Installation
The following instructions is aimed for Centos 6.x systems. Other system could use the equivalent commands to install necessary packages
Python
The current version of RENAT is using Python 2.x.
$ yum -y install centos-release-scl-rh
$ yum -y install python27
$ python --version
Other necessary packages
$ yum install epel-release
$ yum install gettext gcc net-snmp net-snmp-devel net-snmp-utils czmq czmq-devel python27-tkinter xorg-x11-server-Xvfb
$ pip install numpy pyte PyYAML openpyxl Jinja2 pandas paramiko lxml requests
$ pip install netsnmp-py==0.3
Robot Framwork packages
$ pip install robotframework robotframework-selenium2library robotframework-sshlibrary
For more information about Robotframework and installation, check http://robotframework.org/
RENAT checkout and preparation
1. Checkout
Prepare RENAT folder in your working folder
$ cd
$ mkdir work
$ cd work
$ clone https://<git url> renat
2. $RENAT_PATH modify
Make an environment varible $RENAT_PATH pointing the correct RENAT folder.
If you have multi renat (different version) checked out, modify this varible to use the correct RENAT version.
$ export RENAT_PATH=~/work/renat
You could put the above on your startup file for convinience like:
$ echo "export RENAT_PATH=~/work/renat" >> ~/bash.rc
3. Common configuration
RENAT account
Create a common robot account on the RENAT server. This account will be used for collect and set configuration between the test routers and the RENAT server. Following are sample configuration
$ useradd renat -g tech
$ passwd  renat
Edit the global configuration of RENAT config/config.yaml to suite your environment.
Usually only the robot-server and robot-password are need to be modified.
RENAT global configuration
RENAT global configuration files are store in $RENAT_PATH/config folder.
Check and edit device.yaml to includes all your test devices and their IP address
Check and edit template.yaml for access-template that controls the behaviors of RENAT when accessing to different systems.
Check and edit auth.yaml for authentication method when RENAT access to the test devices.
Using the RENAT account information to modify the config.yaml
robot-serveris the IP of the RENAT serverrobot-passwordis the password of the RENAT account onrobot-server
Modifying the extra-lib part to enable/disble extra libraries if it is neccessary. Current support libraries are
Tester: supports IxNetwork and IxLoadArbor: supports Arbor Network TMS applianceSamurai: supports Samurai application (a NTT Communications product)OpticalSwitch: supports Calient L1 switch
Ixia Network and Ixia Load modules (optional)
You need to access to proper Ixia softwares by your own and following its instruction correctly. The following instructions are just examples.You could by pass this part if you are not intending to use Ixia control modules.
$ yum install java-1.8.0-openjdk java-1.8.0-openjdk-devel ld-linux.so.2
$ ./IxOS6.80.1100.9Linux64.bin (/opt/ixia/ixos/6.80-EA-SP1)
$ ./IxNetworkTclClient7.41.945.9Linux.bin (/opt/ixia/ixnet/7.41-EA)
Sample for startup file ( /etc/profile.d/ixia.sh ) that set necessary variables for Ixia clients
IXIA_VERSION=8.01.0.2

IXL_libs=$IXIA_HOME/ixload/8.01.99.14
IXOS_libs=$IXIA_HOME/ixload/8.01.99.14/../../ixos-api/8.01.0.2

PYTHONPATH=$IXL_libs:.:$IXOS_libs:$PYTHONPATH
for LIBS in "$IXL_libs $IXOS_libs"
do
    for FOLDER in `find $LIBS -type f -name pkgIndex.tcl | rev | cut -d/ -f2- | rev`
    do
        TCLLIBPATH="$TCLLIBPATH $FOLDER"
        PYTHONPATH="$PYTHONPATH:.:$FOLDER"
    done
done

export TCLLIBPATH
export IXIA_VERSION
export IXL_libs
export PYTHONPATH
Notes:
The concept of Tester module is that the configuration should be created using Tester GUI (like Ixia Network or Ixia Load). RENAT framework supports controling the test items, stop/run the tests etc. but does not support traffic genrating itself
Web server (optional)
It is more convinence to access the test result from a web browser. Configure your favorite web server to display to access the test project and test item folder.
The following is a snipset of Apache config file (httpd.conf) to show the user work directory. Any RENAT test project or test item could be access easily from browser with following URL like: http://
<IfModule mod_userdir.c>
    #
    # UserDir is disabled by default since it can confirm the presence
    # of a username on the system (depending on home directory
    # permissions).
    #
    # UserDir disabled
    # UserDir enabled *
    #
    # To enable requests to /~user/ to serve the user's public_html
    # directory, remove the "UserDir disabled" line above, and uncomment
    # the following line instead:
    #
    UserDir work

</IfModule>
Installation check
Make sure you have right Python (2.x) and runnable Ixia module (if Tester module is necessary)
$ python --version
Python 2.7.13
$ python
Python 2.7.13 (default, Apr 12 2017, 06:53:51)
[GCC 4.4.7 20120313 (Red Hat 4.4.7-18)] on linux2
Type "help", "copyright", "credits" or "license" for more information.
>>> import IxNetwork
>>> import IxLoad
Make sure $RENAT_PATH is set correctly
$ printenv | grep RENAT_PATH
RENAT_PATH=/home/user/work/renat
Usages
Below example assumes that you’ve already have a test router running JunOS.
1. Create a sample project
$ cd ~/work
$ $RENAT_PATH/tools/project.sh sample
created test project:  sample
use item.sh to create test case
$ tree sample
sample
├── lab.robot
├── renat.rc
├── run.sh
└── setpath.bashrc
2. Create a sample test item
$ cd sample
$ $RENAT_PATH/tools/item.sh item01
Create local configuration file (local.yaml) or not [yes,no=default]:y
Use tester [ex:ixnet03_8009]:
Use tester config file [ex:traffic.ixncfg]:
Use node list (comma separated) [ex:vmx11]:vmx11
Use web app list (comma separated)[ex:samurai1]:


=== Created `item01` test item ===
Case scenario:     /home/user/work/renat/tools/item01/main.robot
Case run file:     /home/user/work/renat/tools/item01/run.sh
Local config file: /home/user/work/renat/tools/item01/config/local.yaml
Tester config file:/home/user/work/renat/tools/item01/config/
Check and change the `local.yaml` local config file if necessary
$ tree item01
item01
├── config
│   ├── local.yaml
│   └── vmx11.conf
├── lab.robot -> ../lab.robot
├── main.robot
├── readme.txt
├── renat.rc
├── result
├── run.sh
└── tmp

4 directories, 10 files
3.Edit scenario file
The ‘config/local.yaml` file includes local information for each test item. Edit this file to add more test devices, tester or other item specific information.
Edit main.robot file in test item folder to look like this
# Basic setting
*** Setting ***
Documentation   This is a sample test item
Metadata        Log File    [.|${CURDIR}/result]
Suite Setup     Lab Setup
Suite Teardown  Lab Teardown

# Common setting
Resource        lab.robot

# Variable setting
*** Variables ***


*** Test Cases ***
01. First item:
    Router.Switch               vmx11
    Router.Cmd                  show version
4.Check to scenario
Using --dryrun option to check the current scenario
$ ./run.sh --dryrun
Current RENAT path: /home/user/work/renat
Run only once
Current local.yaml: /home/user/work/renat/sample/item01/config/local.yaml
Loaded extra library `Tester`
Loaded extra library `Arbor`
==============================================================================
Main :: Testing item01
==============================================================================
01. First item:                                                       | PASS |
------------------------------------------------------------------------------
Main :: Testing item01                                                | PASS |
1 critical test, 1 passed, 0 failed
1 test total, 1 passed, 0 failed
==============================================================================
Output:  /home/user/work/renat/sample/item01/result/output.xml
Log:     /home/user/work/renat/sample/item01/result/log.html
Report:  /home/user/work/renat/sample/item01/result/report.html
5. Run the test
Execute ./run.sh to run the test. Test result and log files are in the ./result folder.
$ ./run.sh
Current RENAT path: /home/user/work/renat
Run only once
Current local.yaml: /home/user/work/renat/sample/item01/config/local.yaml
Loaded extra library `Tester`
Loaded extra library `Arbor`
Loaded extra library `OpticalSwitch`
==============================================================================
Main :: item01: very simple sample
==============================================================================
RENAT Ver:: RENAT 0.1.6
------------------------------------------------------------------------------
README:
The sample requires a running Juniper router

------------------------------------------------------------------------------
00. Lab Setup
------------------------------------------------------------------------------
01. First item:                                                       | PASS |
------------------------------------------------------------------------------
99. Lab Teardown
------------------------------------------------------------------------------
Main :: item01: very simple sample                                    | PASS |
1 critical test, 1 passed, 0 failed
1 test total, 1 passed, 0 failed
==============================================================================
Output:  /home/user/work/renat/sample/item01/result/output.xml
Log:     /home/user/work/renat/sample/item01/result/log.html
Report:  /home/user/work/renat/sample/item01/result/report.html
In case you has configure a web server, access ./result/log.html or ./result/report.html for more details about the result.
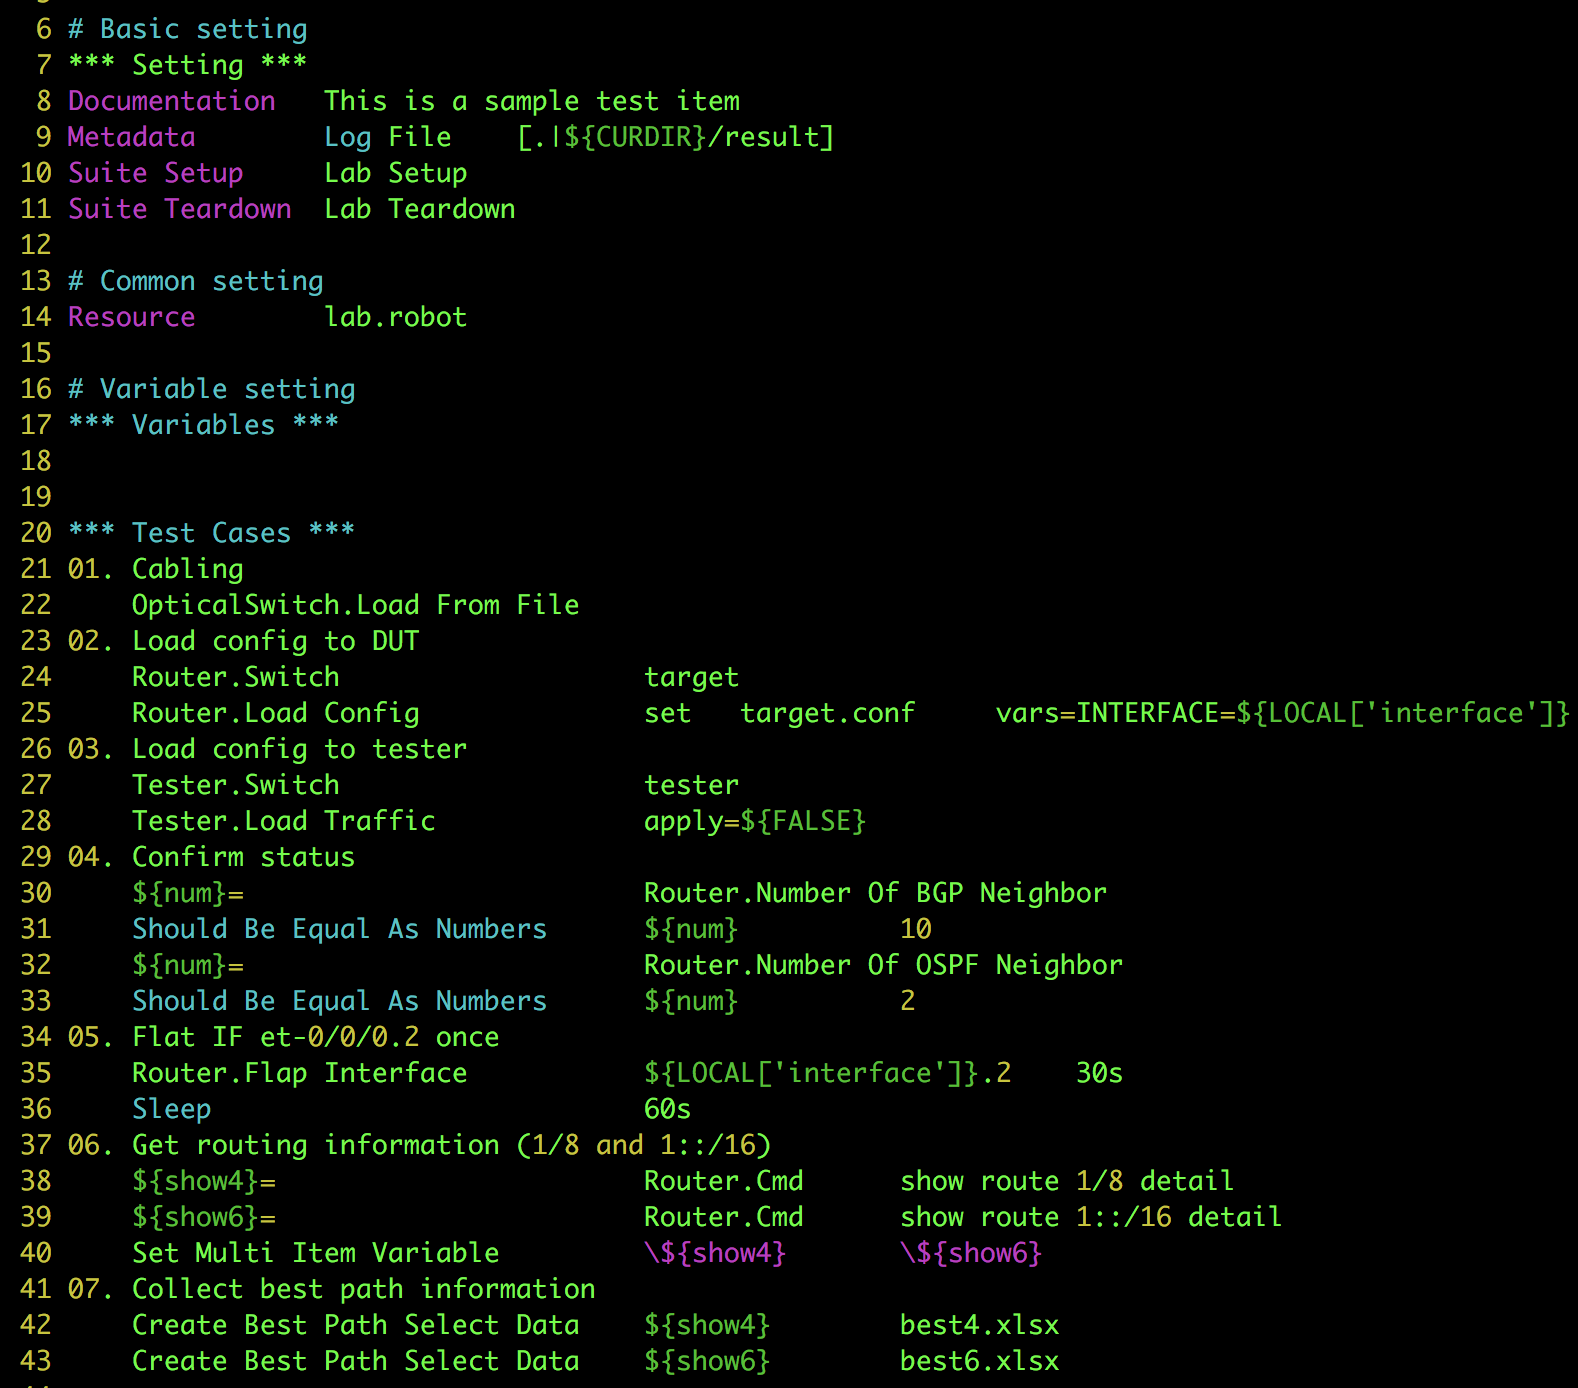
More Examples
- See item02 for sample about
Exec Filekeyword - See item03 for sample about BGP Best Path Selection testing for a JunOS router
Manual
See manual for more details about RENAT keywords and its modules.
Copying And Copyrights
This project is licensed under the Apache v2.0 license. For more detail see license
Thanks
Thanks to everybody has encouraged, tested and supported this project. All comments, advices and co-operation are appreciated.